


Outbound Calls
with AI voice agents
A call agent is the voice, the script and the rulesfor one kind of conversation — a follow-up, an appointment reminder, a leadqualification. You build it once, then use it two ways: a single call to oneperson, or a batch campaign from a CSV. This guide covers both, starting fromsign-in.
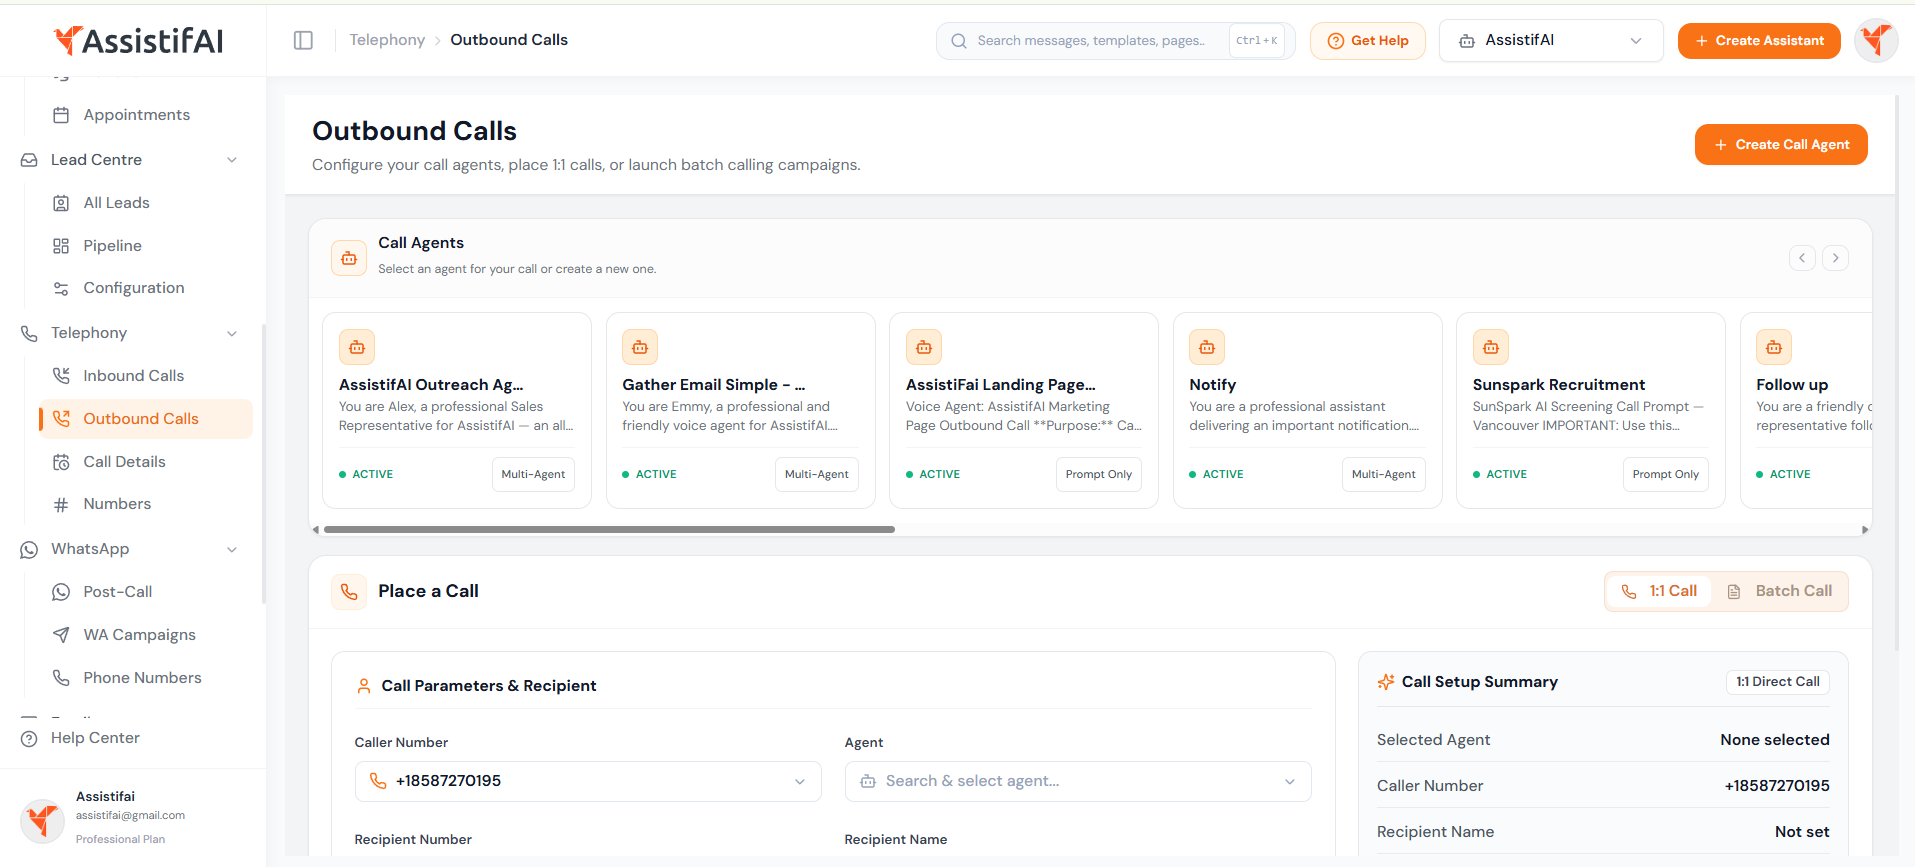
Step 1: OpenTelephony → Outbound Calls
In the left sidebar, expand Telephony and click Outbound Calls.The neighbouring items matter later: Call Details is where finished calls and transcripts land, and Numbers is where your caller numbers live.
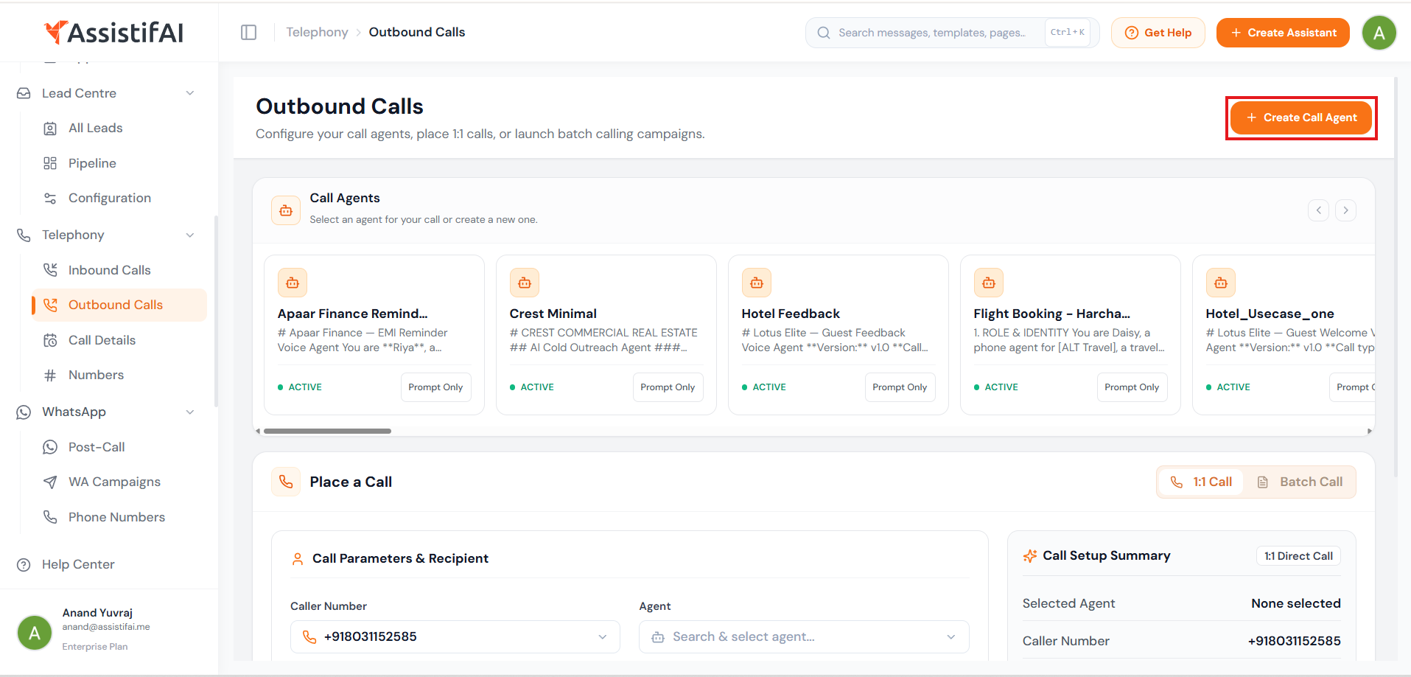
Step 2: Get your bearings, then click Create Call Agent
The page has two halves. Call Agents at the top is a scrolling row of the agents you already have, each showing the opening line of its prompt, an ACTIVE badge, and whether it runs Prompt Only or With Sub-Agents. Place a Call below is where you actually dial. To build a new agent, click Create Call Agent, top right.
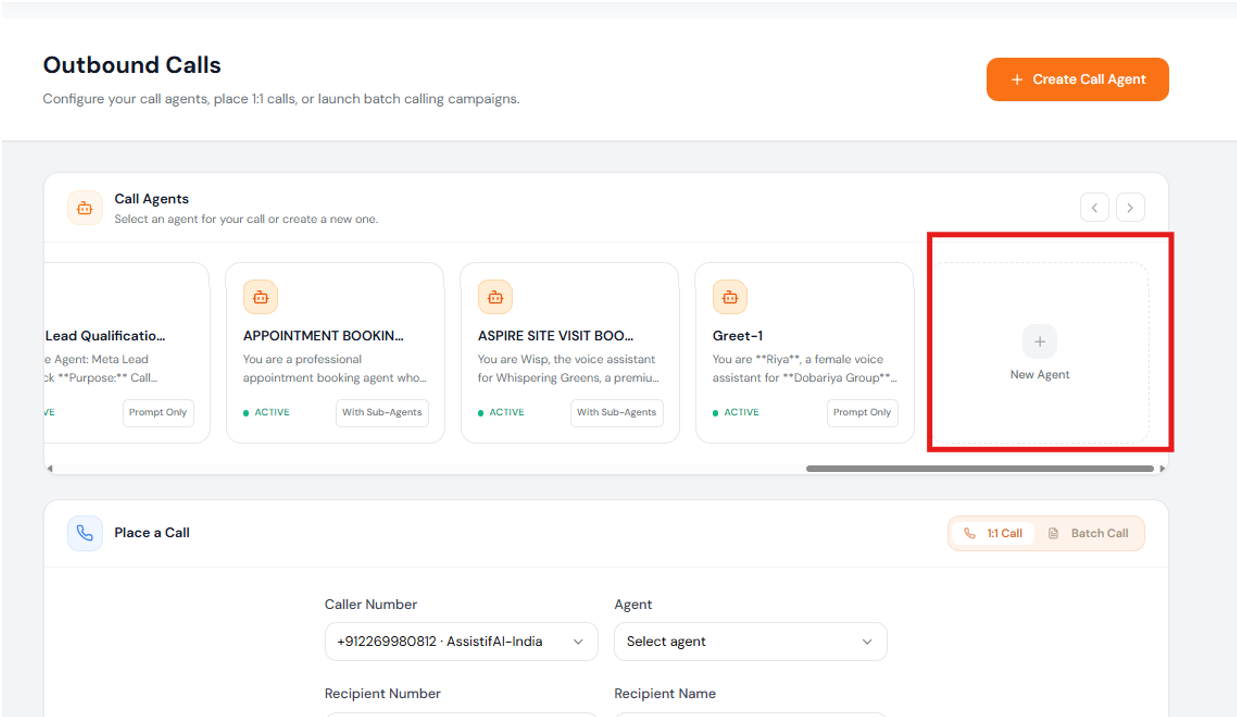
Or use the New Agent card
Scroll the Call Agents row to its end and the last card is New Agent. It opens the same dialog as the button — use whichever is closer to hand.

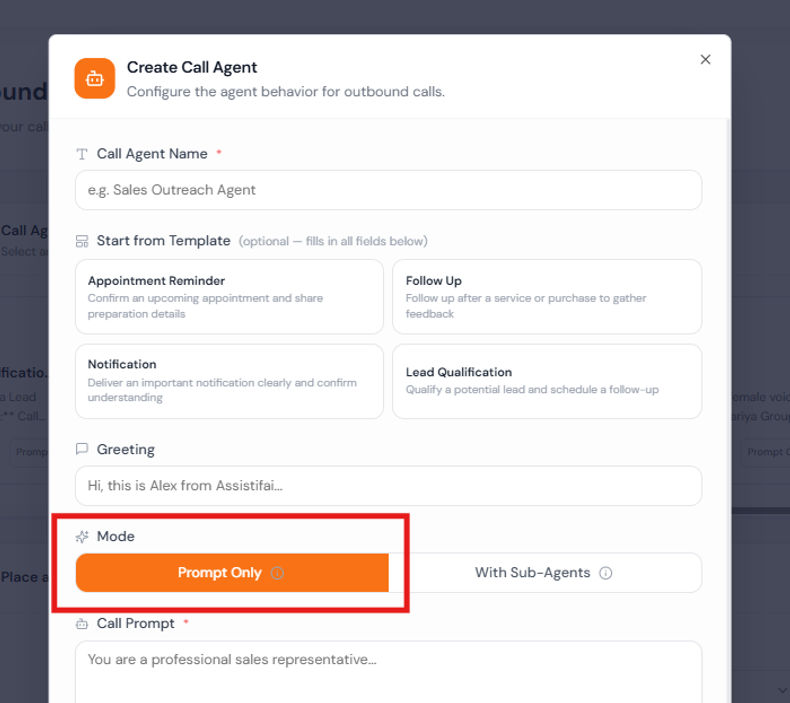
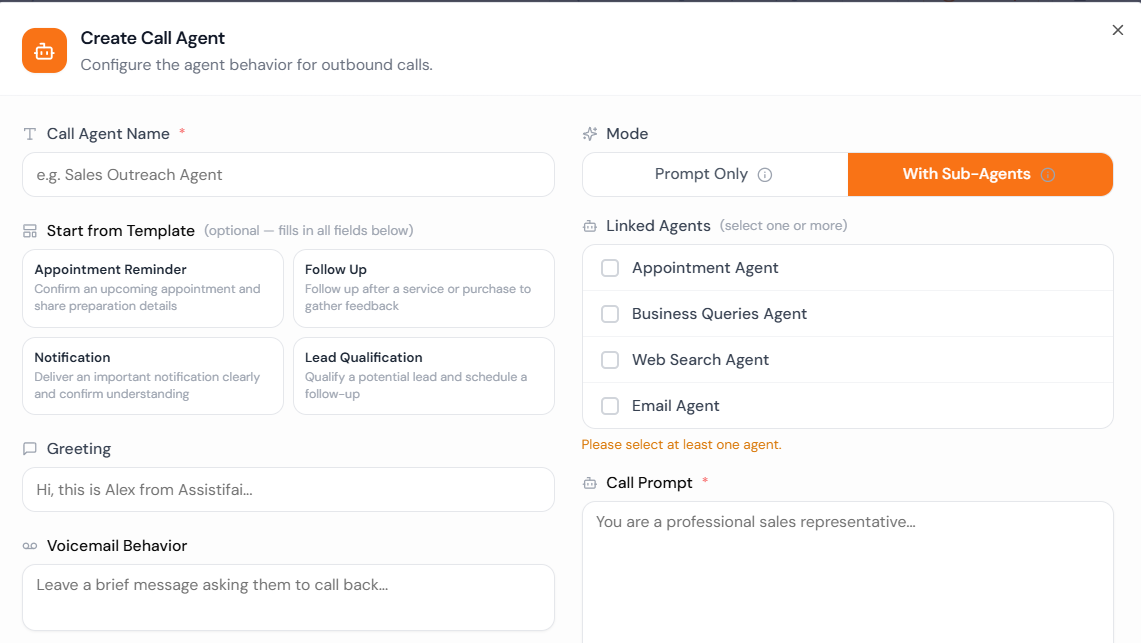
Step 3: Name it, pick a template, set the greeting
Give the agent a Call Agent Name you will recognise in adropdown later. Startfrom Template is optional and fills in every field below it —Appointment Reminder, Follow Up, Notification or Lead Qualification. The Greetingis the first thing the recipient hears.
Then choose a Mode. Prompt Only is the simpler one: the agenttalks from its prompt and nothing else. Pick it when the call is a message, areminder or a straight qualification.
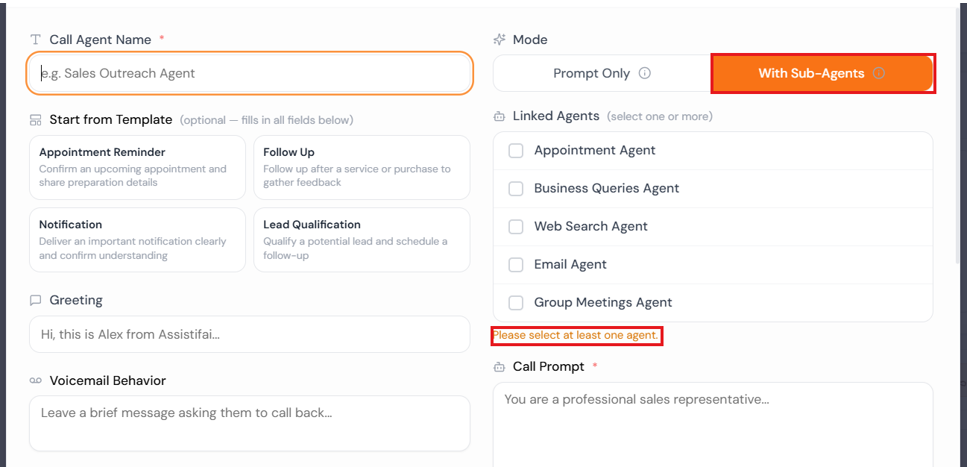
Step 4: Or switch to With Sub-Agents
Choose With Sub-Agents when the call needs to dosomething, not just say something — book a slot, answer a question about yourbusiness, look something up, send an email, set up a group meeting. A Linked Agentslist appears, and until you tick at least one the dialog warns Please select at least one agent.
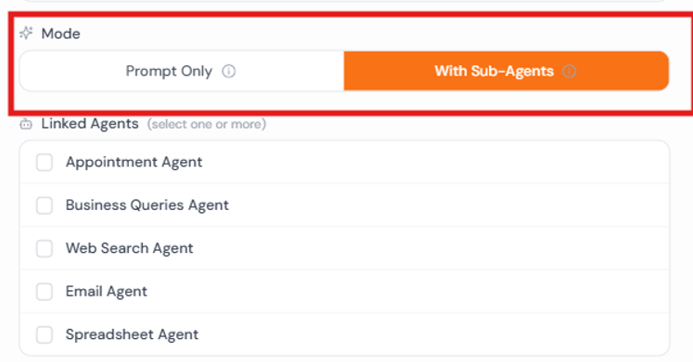
Step 5: Tick the sub-agents the call may use
Pick from Appointment Agent, Business Queries Agent, Web Search Agent, Email Agent and Spreadsheet Agent. Tick only what the conversation genuinely needs — each one is a capability you are handing the AI mid-call. Appointment plus Business Queries covers most booking calls.
Step 6: Write the Call Prompt
This is the agent’s brief: who it is, why it iscalling, what to ask, and when to stop. It is the field that decides how thecall actually goes, so be specific. The box grows as you type, or drag itsbottom-right corner.
Note the line underneath: dynamic values can be loaded at callcreation via CSV columns. That is how one prompt personalises itselfacross a whole batch — see steps 16 and 17.
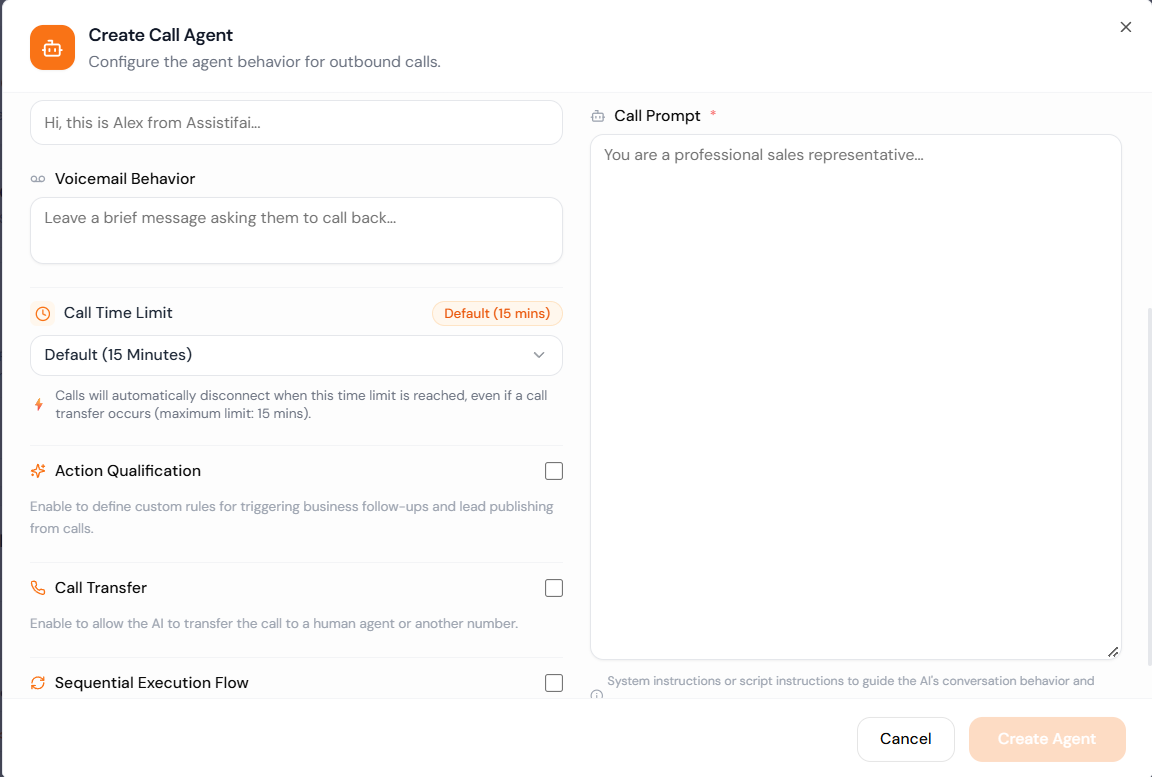
Step 7: Set Voicemail Behavior
Below the greeting, Voicemail Behavior is what the agent says if the call is picked up by voicemail instead of a person. Keep it short: who is calling, what it is about, and what you want the person to do next — usually to call back. The example here leaves a brief message asking the person to call back about their interview.
Step 8: Turn on Action Qualification
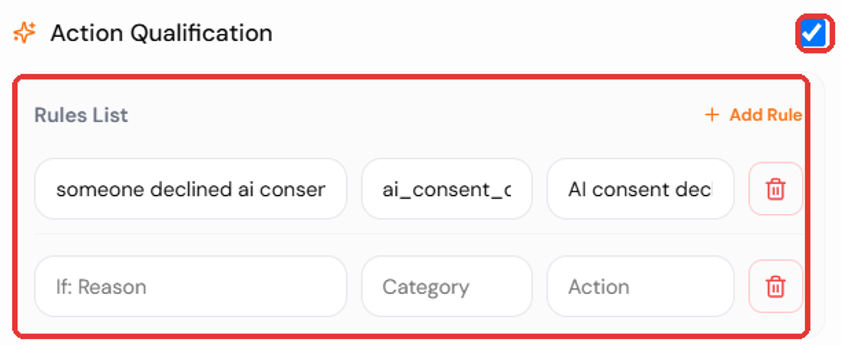
Action Qualification lets you define your own rules for what should happen after a call —business follow-ups and lead publishing. Tick the checkbox and a Rules List appears. Each rule is one row with three fields:
• If: Reason — describe in plain words thesituation on the call that should trigger the rule, for example “declines AIscreening”.
• Category — a short label the call is filedunder when the rule matches, for example “ai_declined”.
• Action — the follow-up to trigger when therule matches.
Click + Add Rule to add another row, and use the redbin icon at the end of a row to delete it. Remove any row you do not need.
Write one situation per rule and keep category labels short, lowercase and consistent (words joined by underscores) so they are easy to spot later. Anything the rules produce — a follow-up or a published lead —appears under Leads Centre ,as described at the end of this guide.
Step 9: Enable Call Transfer
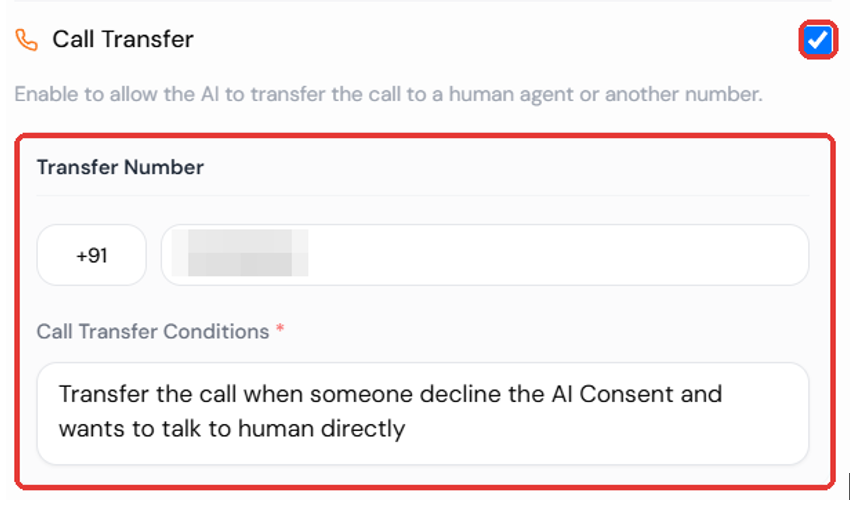
Call Transfer lets the AI hand the livecall to a human agent or another number. Tick the checkbox and two fieldsappear:
• Transfer Number — pick the country code (forexample +91) and type the number the call should be passed to. Use a line thatwill be answered during your calling hours.
• Call Transfer Conditions (required, markedwith a red asterisk) — say in plain words when the AI should transfer. Forexample: “Transfer the call when the person says they do not want to continuewith AI screening or asks to speak to a human.”
Be specific about the trigger, so the AI transferswhen it should and not on every hesitation. Transfer pairs well with ActionQualification: the example agent has a rule that logs people who decline AIscreening, and a transfer for those who ask for a human instead. After saving,test it with a 1:1 call — say the trigger phrase and confirm the number rings.
Step 10: Choose Sequential Execution Flow, then save the agent
Sequential Execution Flow is the last checkbox. When it is ticked, a batch places the next call only after the previous call has ended. It is slower, but gentler on a small team — for instance when calls may be transferred to one person. Leave it unticked if you want the batch to dial in parallel.

When every option is set, click Create Agent. If you are editing an existing agent, the button reads Save Changes. The agent then appears in the Call Agent srow and in the Agent dropdown under Place a Call.
Placing the calls
The Place a Call card has two tabs. 1:1 Call dials one person — the right way to hear your agent before you trust it with a list. Batch Call runs a CSV.
Step 11: Pick the agent and fill in a 1:1 call
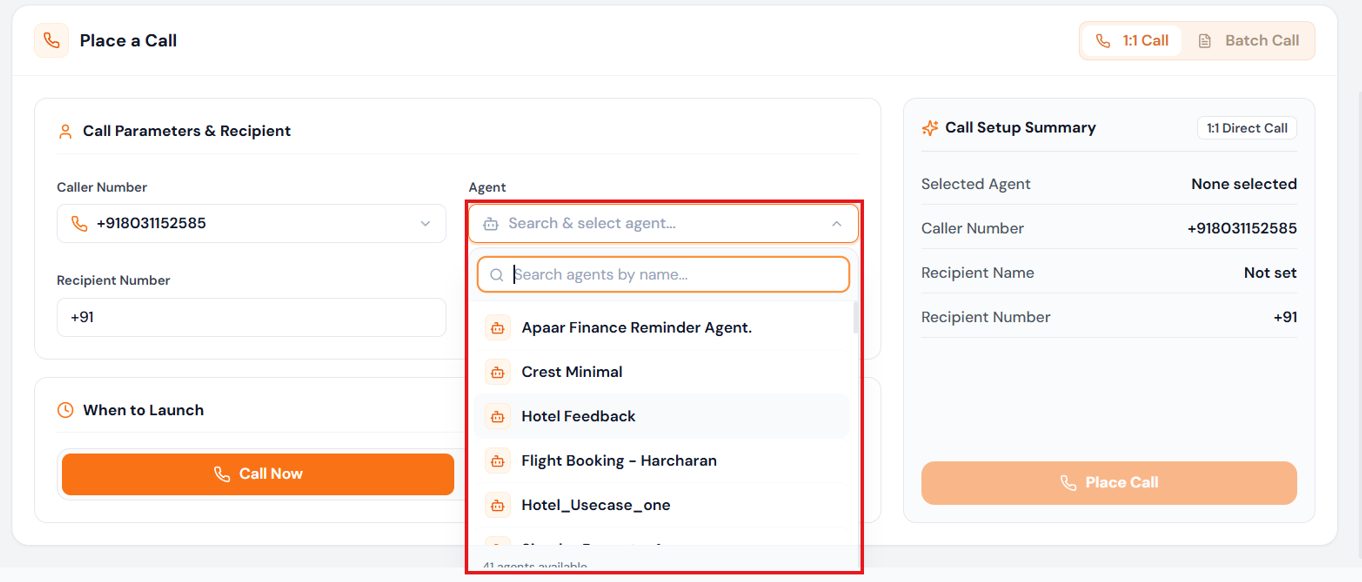
On the 1:1 Call tab, set the Caller Number the recipient will see. Click the Agent field and either scroll the list or type to search by name — your account shows how many agents are available at the bottom of the list. Then enter the Recipient Number and Recipient Name; the agent uses that name on the call. The Call Setup Summary on the right updates as you go, so you can check your choices at a glance.
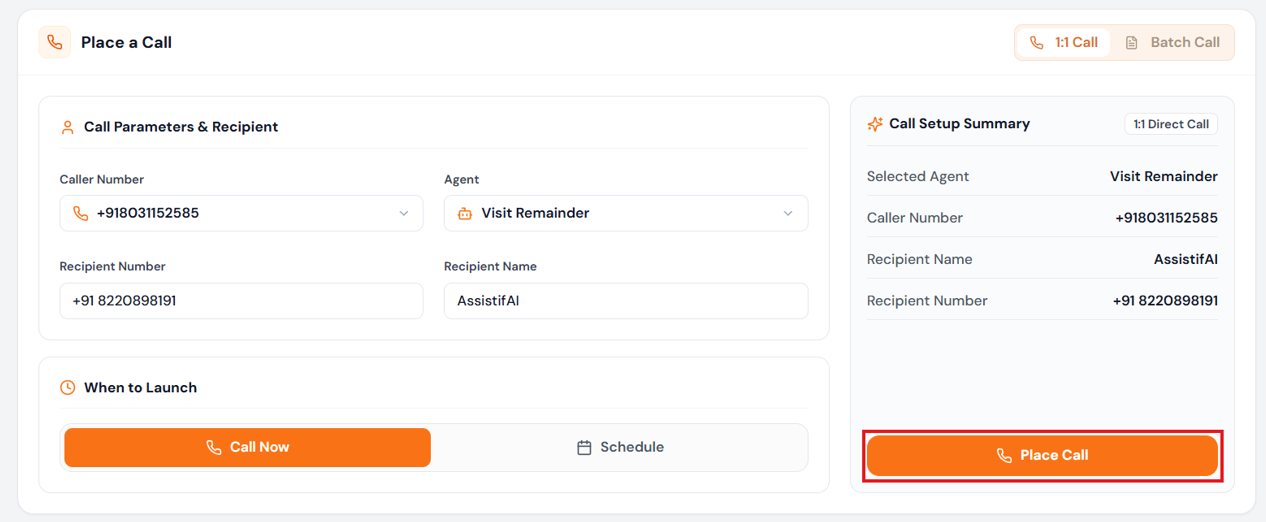
Click Place Call
Keep Call Now selected under When to Launch. The Place Callbutton only turns solid orange once the form is complete — if it still looksfaded, something above is missing. Click it and the AI dials. The call, itsduration and its transcript appear afterwards under Telephony → Call Details.
Or schedule the 1:1 call for later
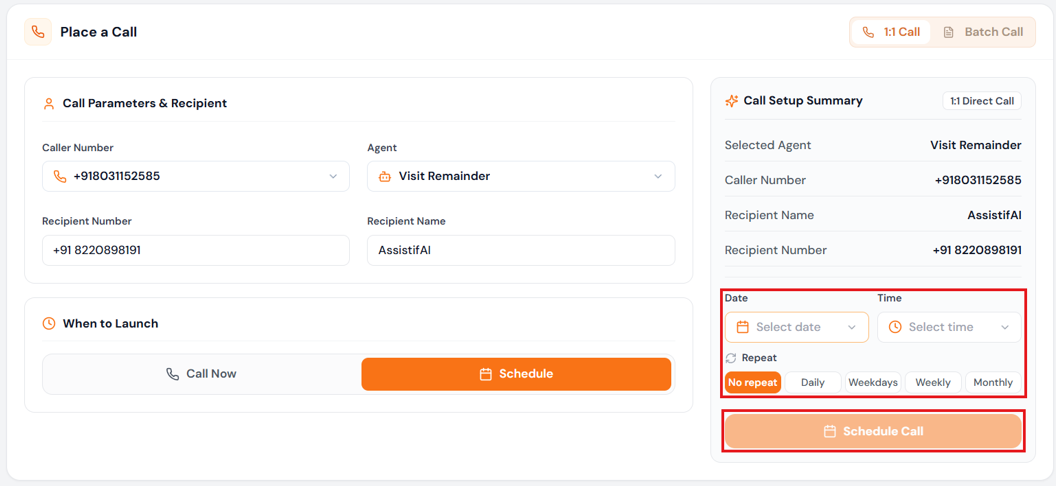
Under When to Launch, choose Schedule instead of Call Now. A Dateand Time picker appears in the Call Setup Summary, along with a Repeat option: No repeat,Daily,Weekdays,Weeklyor Monthly.Pick your slot, then click Schedule Call — the button stays faded untilthe date and time are set.
Step 12: For a campaign, switch to Batch Call and upload a CSV
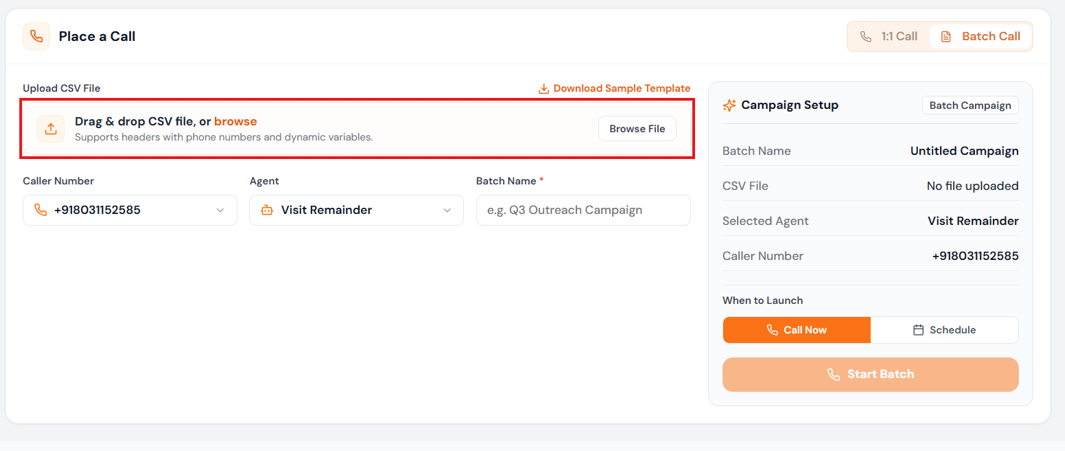
Click Batch Call, then drag in your file or use browse.The file must include a phone number column (for example phone_number). Every othercolumn becomes a dynamic variable your prompt can use, so a column like “Name”or “Email” personalises each call. Download Sample Template gives you the format.
Check the columns, name the batch and start it
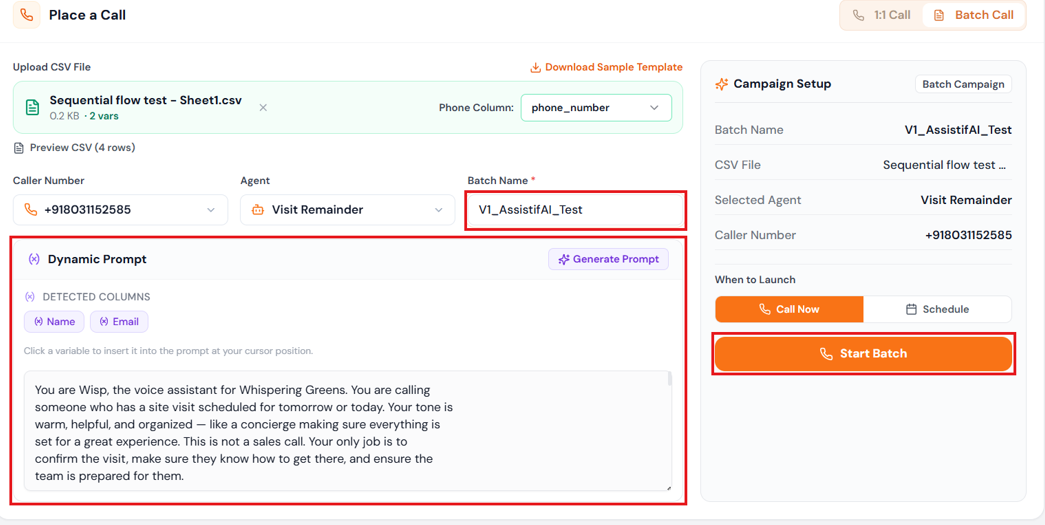
Once the file is uploaded, confirm the Phone Column and use PreviewCSV to check your rows. Set the Caller Number and Agent as before, then give the run a Batch Name you will recognise in reporting. The Dynamic Prompt panel lists the Detected Columns from your file — click one to drop it into the prompt at your cursor, or use Generate Prompt to draft the prompt for you. With Call Now selected, click Start Batch. Test the same agent on yourself with a 1:1 call first — a batch goes out to everyone at once.
Or schedule the batch
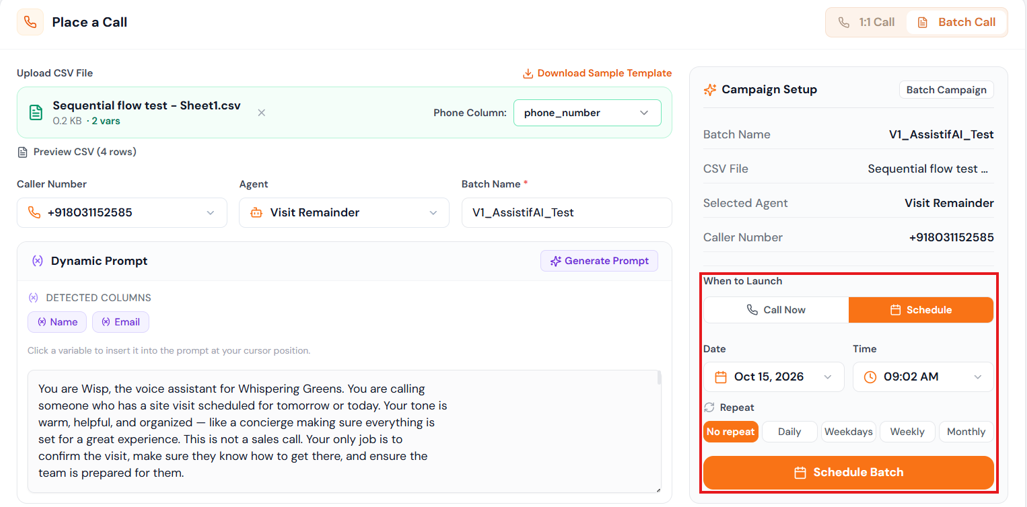
Choose Schedule under When to Launch, then set the Date, Time and Repeat option (No repeat, Daily, Weekdays, Weekly or Monthly). The summary on the right confirms your Batch Name, CSV File, Selected Agent and Caller Number. Click Schedule Batch to lock it in.
Where the results show up
Finished calls, durations and transcripts sit under Telephony → Call Details. Anything the call produced — a booking, a follow-up, a published lead — appears under Leads Centre, in Appointments or All Leads.
If something looks off
Still stuck? Use Get Help in the AssistifAI topbar, or book time with us at assistifai.me/book-a-demo.

