


Inbound calls
with AI voice agents
Outbound is you calling out. Inbound is the otherdirection: someone rings your number and the AI answers. What it says, what itcan do, and what it is trying to achieve on the call all come from an inboundtemplate. This guide builds one and attaches it to your live number.
Step 1: Open Telephony → Inbound Calls
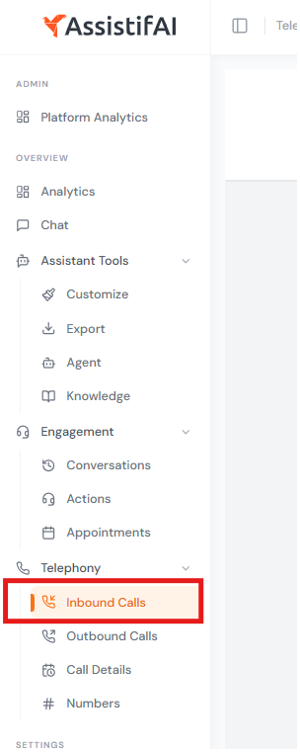
In the left sidebar, expand Telephony and click Inbound Calls— the item directly above Outbound Calls.
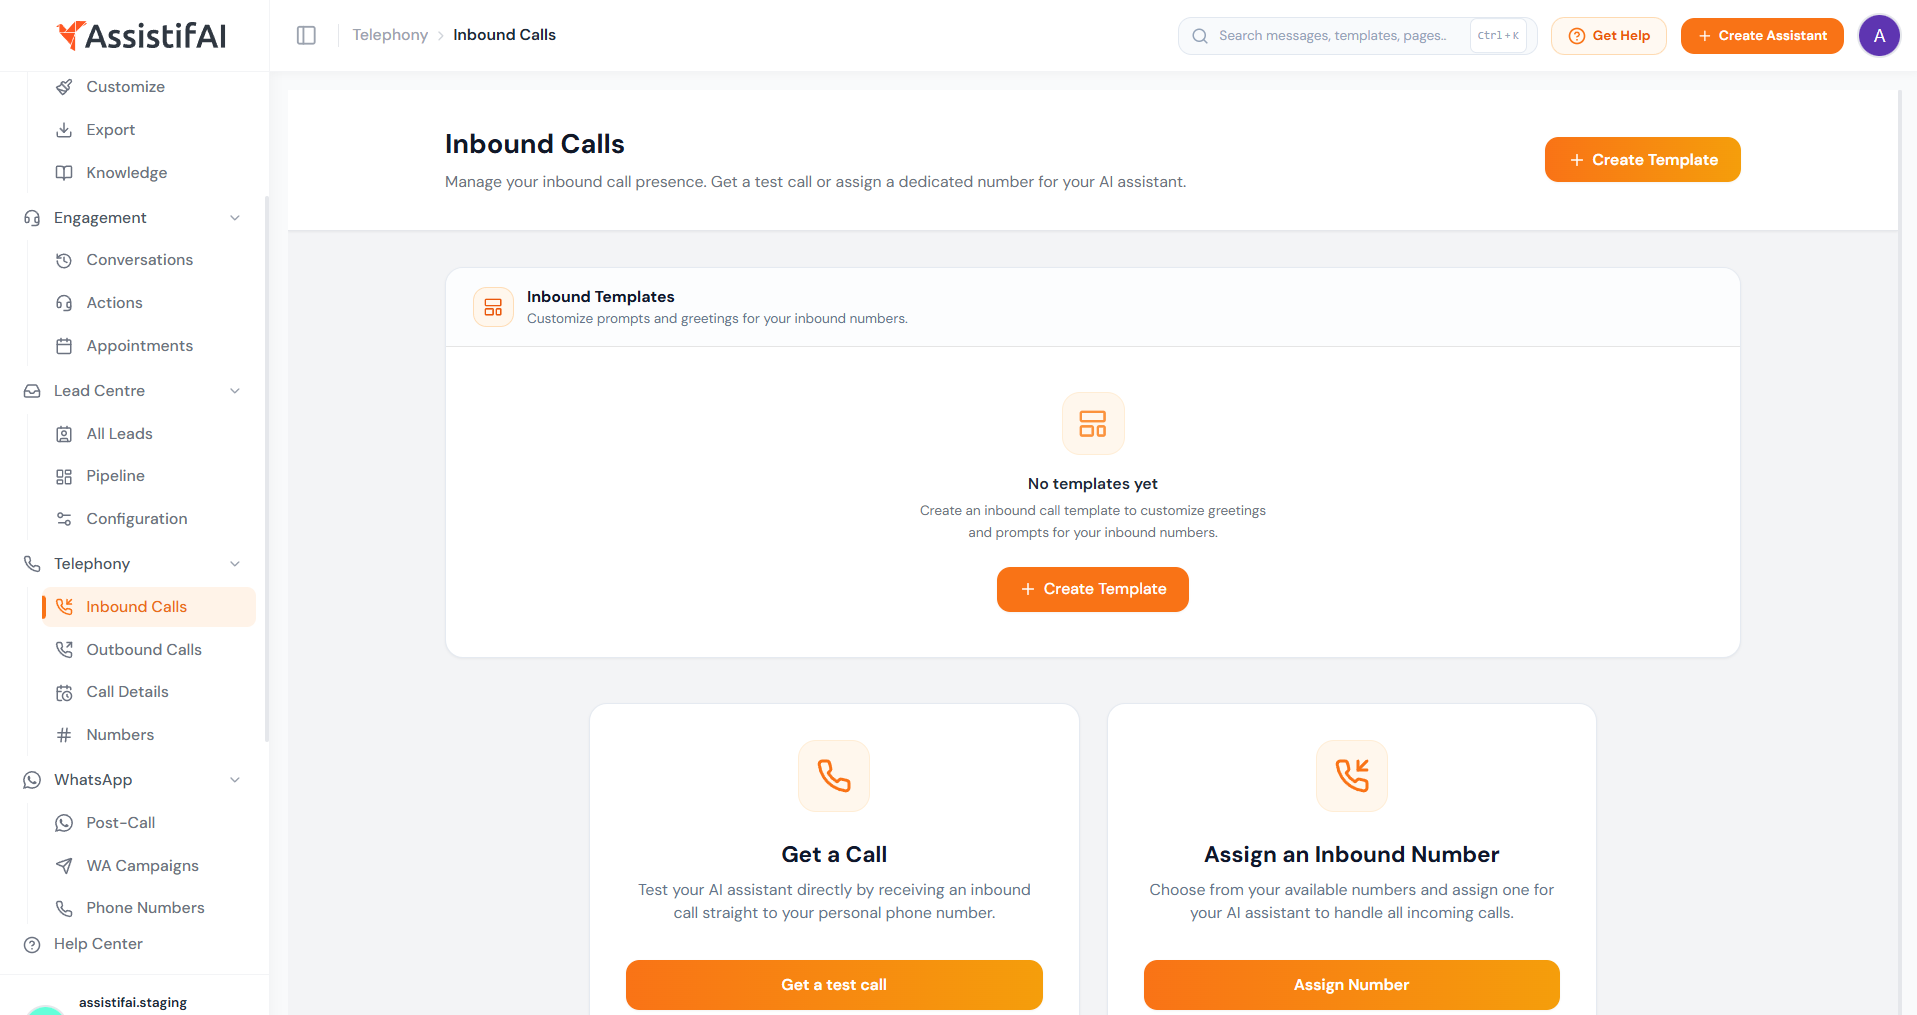
Want to hear it on your own phone?
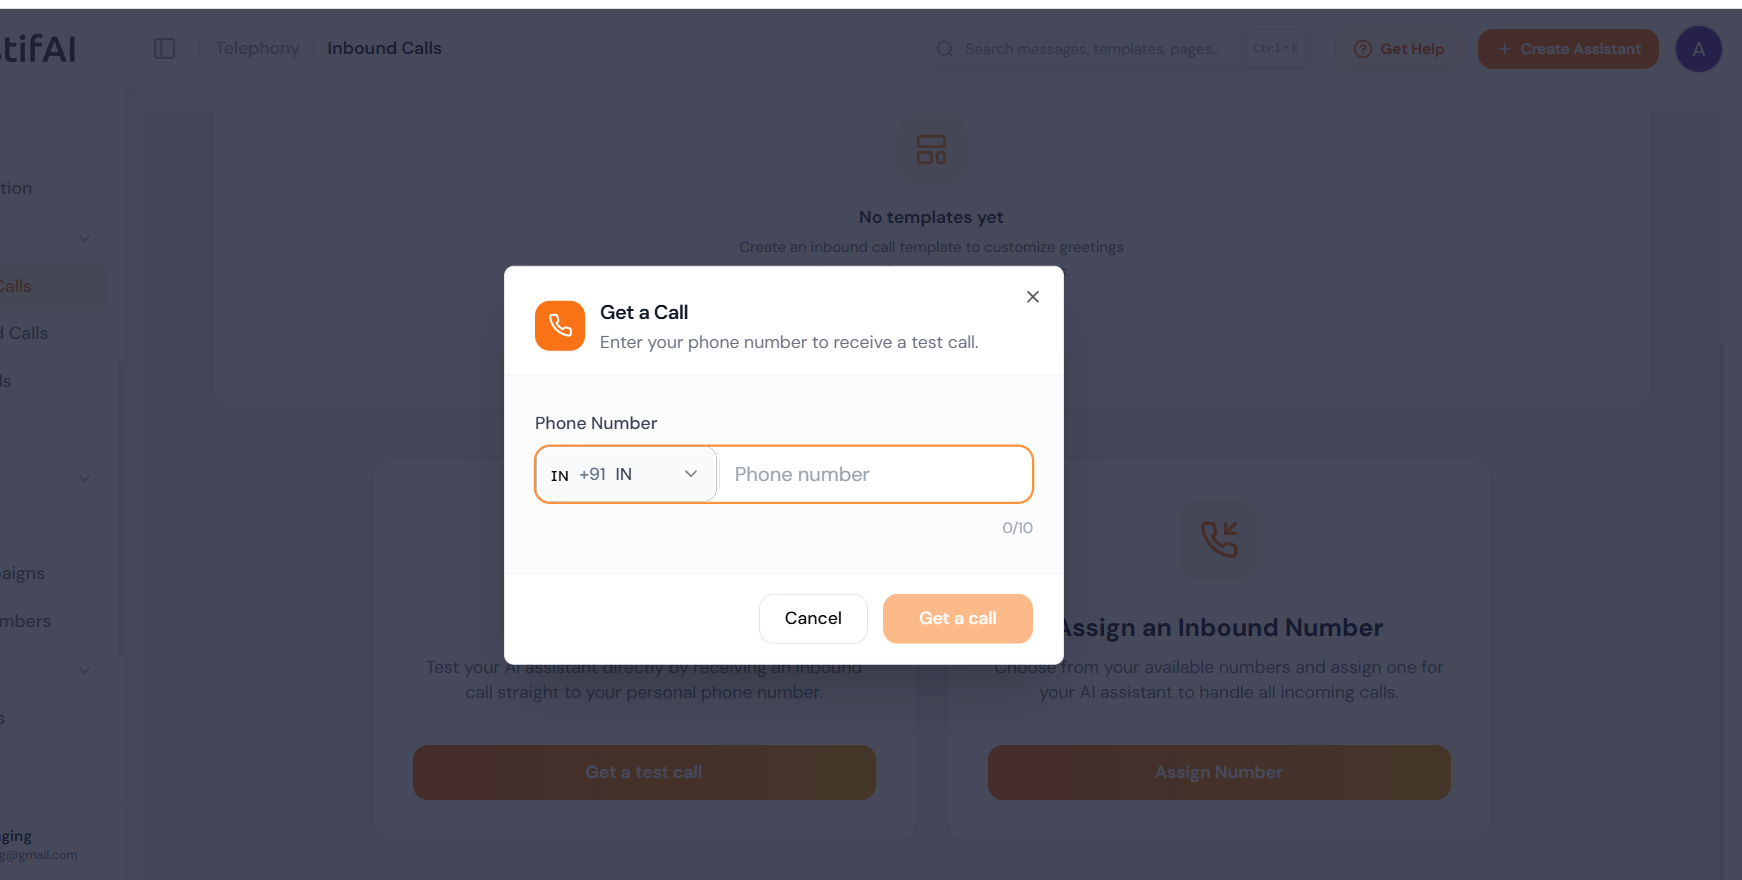
Before Starting, On the empty Inbound Calls page, the Geta test call card lets the AI ring your personal number so you can hear it without a customer involved. Click Get a test call, choose your country code, enter your phone number and click Get a call.
Step 2: Get a phone number first
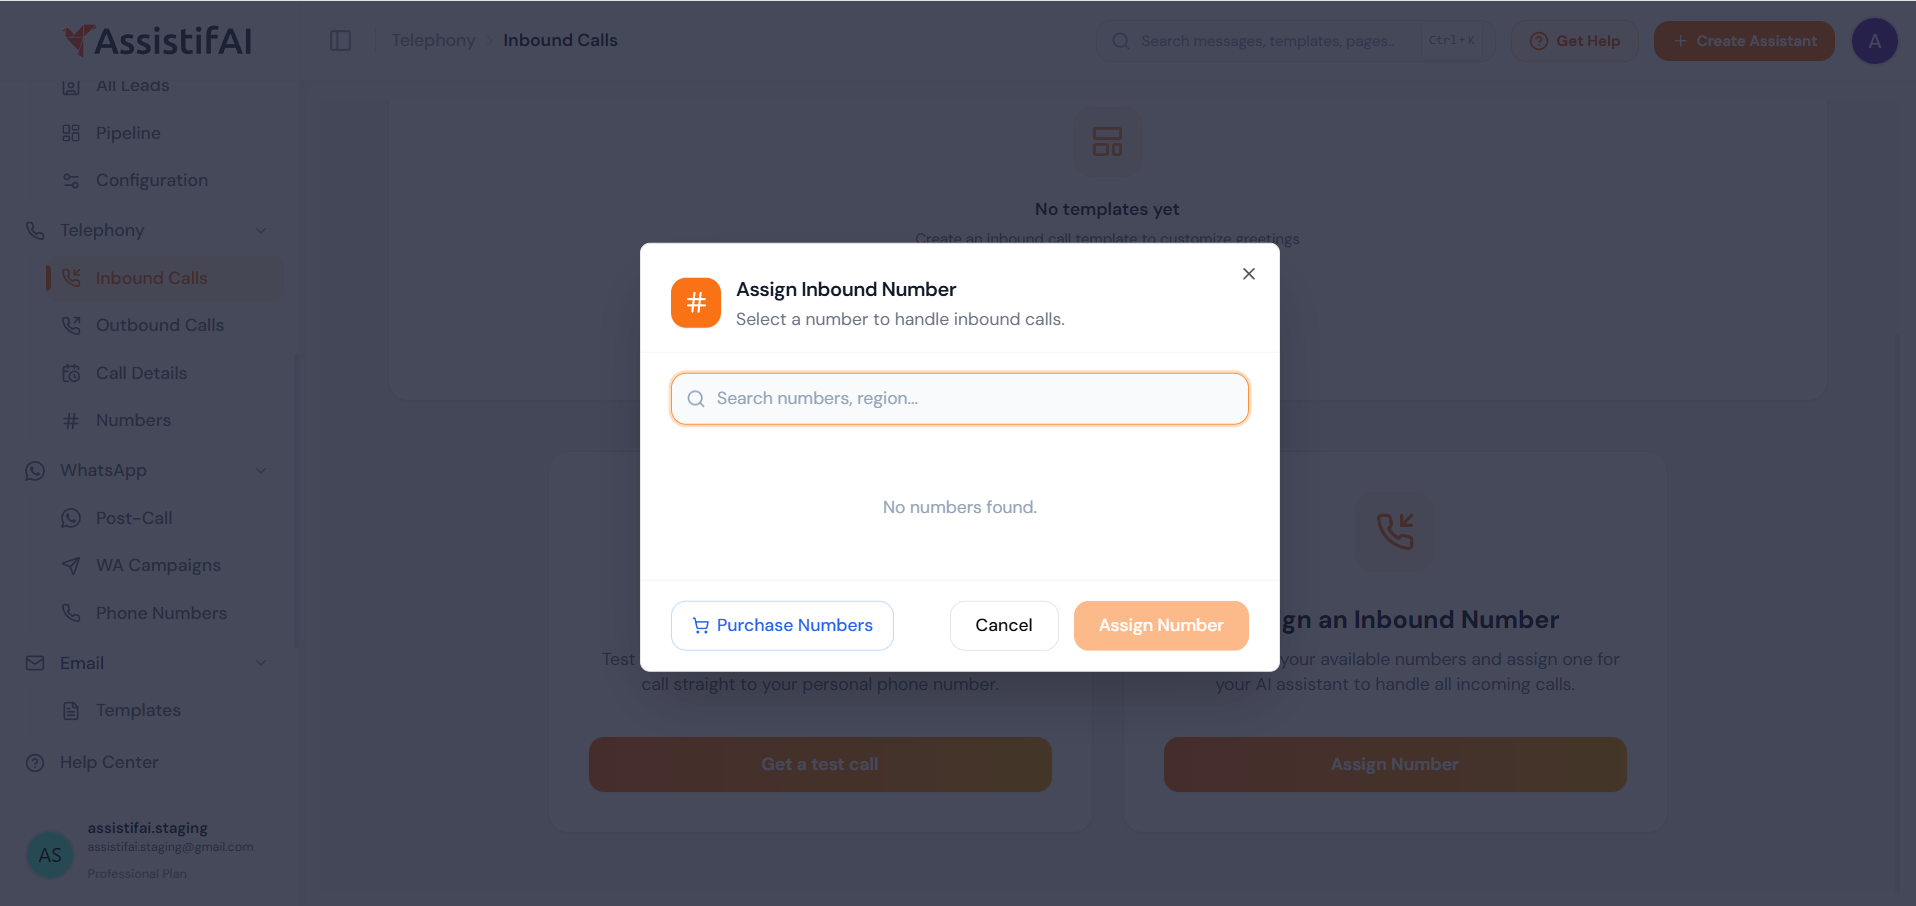
An inbound template needs a number to answer on, and anew account has none. On the Inbound Calls page click Assign Number on the Assign anInbound Number card. If the dialog says No numbers found, you have nonumber yet — click Purchase Numbers at the bottom left.
Buying and managing numbers is covered in its own guide: Phone Numbers — how to purchase and link anumber. Follow it, then come back to this guide at step 3. Your new number will be in the list when you return to assign it (step 7).
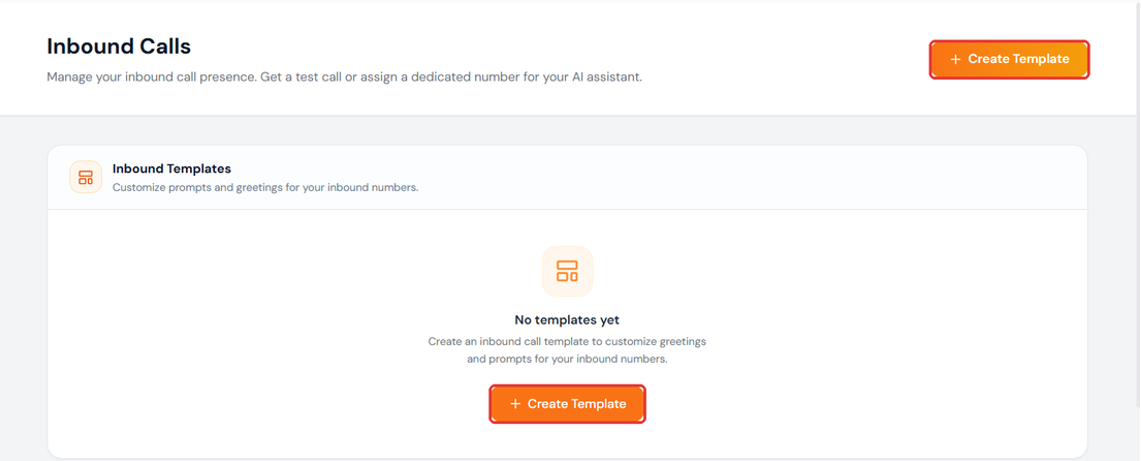
Step 3: Click Create Template
Click Create Template at the top right of the page, or the Create Template button in the middle of the Inbound Templates card. The Create Inbound Template dialog opens. Once you have templates, the dashed New Template tile at the end of the row does the same thing.
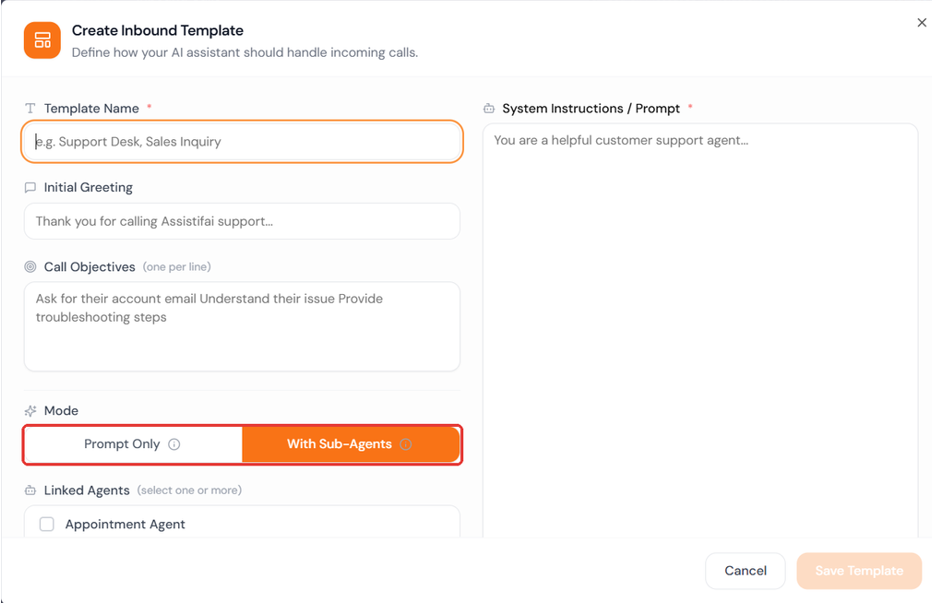
Step 4: Name it, write the greeting, choose Prompt Only
Give the template a Template Name — Support Desk, Sales Inquiry, whatever you will recognise in a dropdown. The Initial Greeting is the first line the caller hears, so it should name your business.
Leave Mode on Prompt Only if the AI just needs to talk —answer questions, take a message, explain your hours. There is no Linked Agentslist to fill in.
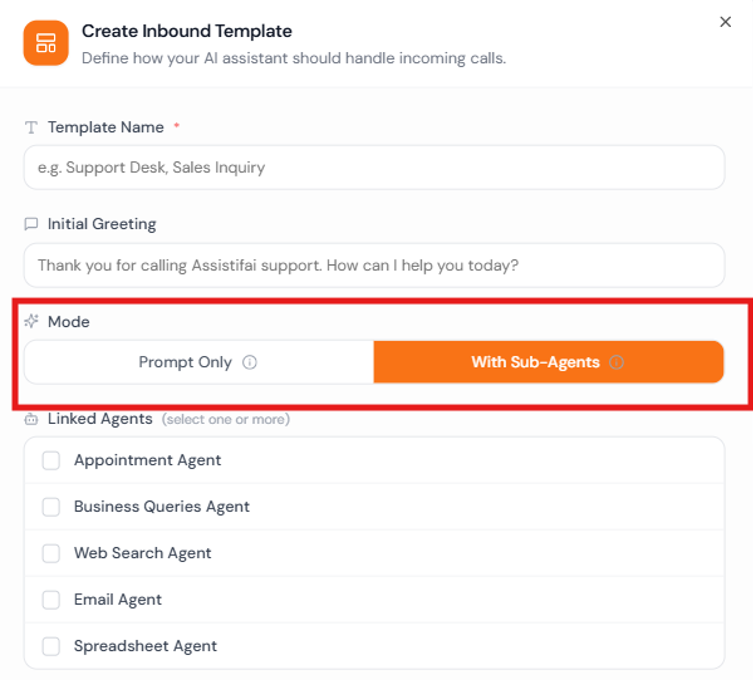
Step 5: Or switch to With Sub-Agents and set the call options
Choose With Sub-Agents when callers will ask the AI to do things. A Linked Agents list appears — Appointment, Business Queries, Web Search, Email and Group Meetings — and the dialog warns Please select at least one agent until you tick one. For a line people ring to book or to ask about your services, Appointment plus Business Queries is the usual pair.
Furtherdown are the call options:
Call Time Limit —defaults to 15 minutes. Calls disconnect automatically when the limit is reached, even if a call transfer occurs. The maximum is 15 minutes.
ActionQualification — rules that tell the AI which situations on a call to recognise and acton. Off by default. Covered in detail after step 6.
Call Transfer — lets the AI hand the callto a human agent or another number. Off by default. Covered in detail afterstep 6.
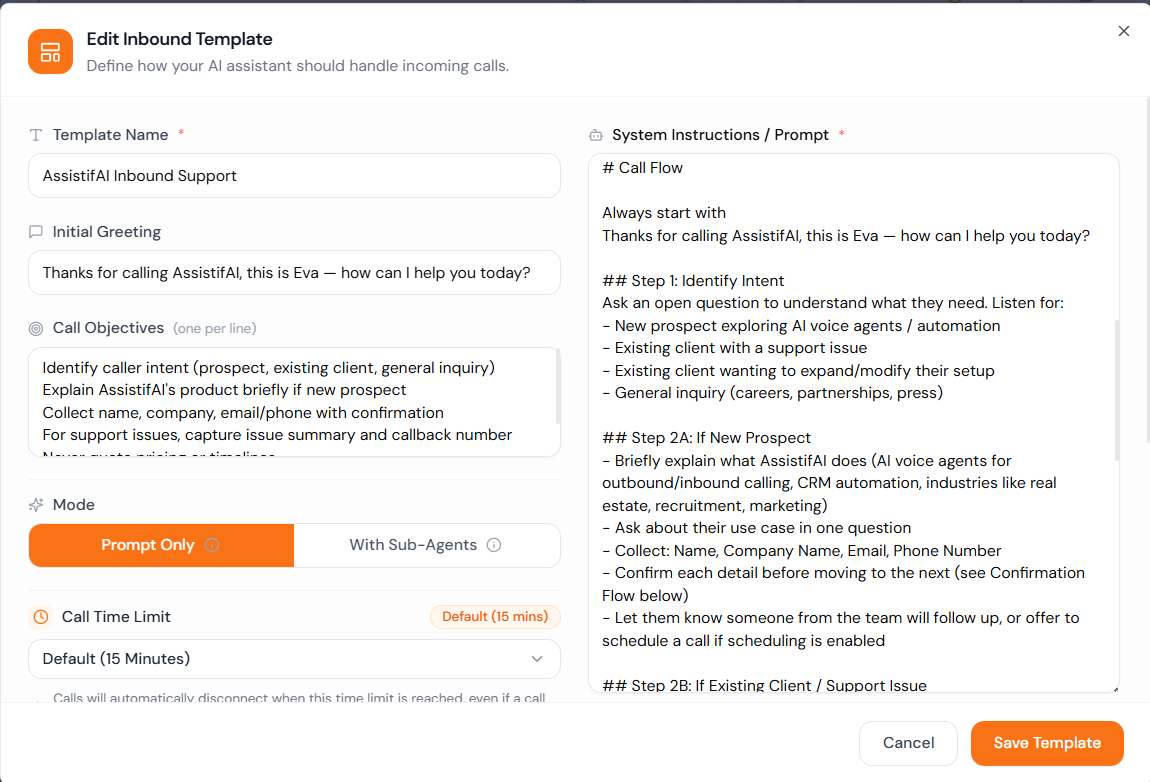
Step 6: Write the prompt and the objectives, then Save Template
Two fields decide how the call goes. System Instructions / Prompt, on the right of the dialog, is who the assistant is and how it should behave. Call Objectives is what a good call achieves —one per line, so “Confirm site visit slots” and “Get their account email” are separate lines, not one sentence.
Click Save Template. It only turns solid orange oncethe name and prompt are filled in. The new template appears in the InboundTemplates row, marked Unassigned until you map it to a number.
ActionQualification and Call Transfer in detail
Both options sit below Call Time Limit in the template dialog and are off by default. A template that only talks does not need either. Turn them on when the AI should act on specific moments in a call, or hand the caller to a person. The same dialog is titled Edit Inbound Template when you reopen a saved template, and the options work the same way.
Action Qualification
ActionQualification gives the AI a short list of rules for situations that matter ona call — a caller declining consent, asking for a human, saying they are notinterested. Each rule names the situation, files it under a category and statesthe action to take. Use it when you want particular outcomes picked out of yourcalls, rather than leaving everything to the prompt.
1. Tick Action Qualification. A Rules List panel opens, with + Add Rule at its top right.
2. Click + Add Rule. A new row appears with three empty fields, side by side: If: Reason, Category and Action.
3. Fill in all three fields(see the table below). The first row in the screenshot is a finished rule; the second is a blank one waiting to be filled in.
4. Repeat for each situation. Use the red bin icon at the end of a row to delete a rule you no longer want.
5. Click SaveTemplate.
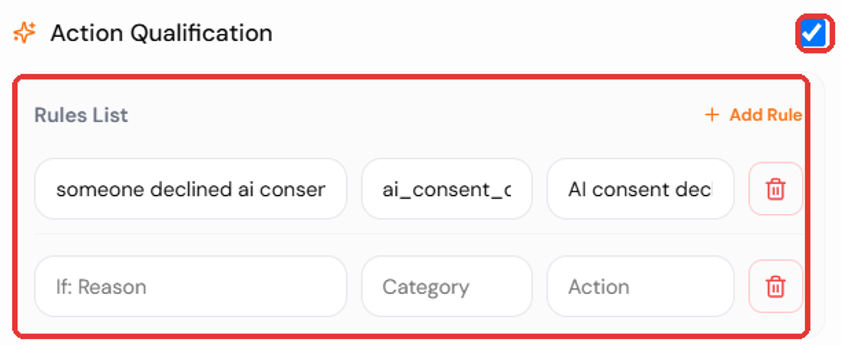
The example is the rule shown in the screenshot, which cuts the Category and Action text short. Write your own wording in full.
Writing good rules
One situation per rule. If two things can happen on a call, write two rules rather than one long one.
Describe it as the caller would do it. “Caller asks to speak to a person” works better than a label like “escalation”.
Keep the prompt and the rules aligned. The prompt decides what the AI says; the rules decide which out comes are picked out. If a rule is about consent, the prompt should say when the AI asks for consent.
Leave no blank rows. A half-filled or empty rule is the first thing to check if Save Template stays faded.
Test each rule. Ring the number, act out the situation, then look for the call in Telephony → Call Details, and for anything it triggered under Lead Centre→ All Leads.
Call Transfer
CallTransfer lets the AI pass the caller to a person — a human agent, or any othernumber — when the situation calls for it. It is the safety net for calls the AIshould not finish itself.
1. Tick Call Transfer. The Transfer Number panel opens under the checkbox.
2. Enter the Transfer Number. Pick the country code in the small box on the left (+91 in the screenshot), then type the number in the wider box beside it, without the country code.
3. Write the Call Transfer Conditions. This field is marked with a red star, so it is required. Describe in plain words when the AI should transfer. The screenshot’s examplereads: Transfer the call when someone declines the AI consent and wants to talk to a human directly.
4. Click Save Template.
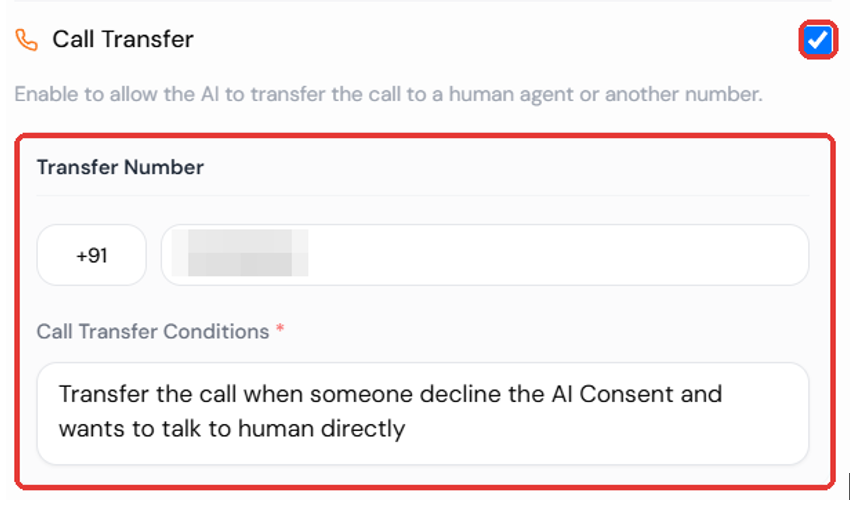
Writing good transfer conditions
Be specific. Name the exact situation, such as “the caller asks for a human” or “the caller wants to cancel”. A vague condition like “when needed” leaves the AI guessing.
Say it in the prompt too. Tell the AI what to say before it transfers, for example a short line such as“ someone from our team will connect with you shortly”, then to transfer. The condition says when; the prompt says how.
Use a number that will be answered. Check the country code and digits, and make sure someone is there to pick up during the hours you take calls.
Remember the time limit. The Call Time Limit still applies after a transfer. The call disconnects when the limit is reached, even if it has been transferred, and the maximum is 15 minutes.
Test it. Ring your inbound number,trigger the condition, and confirm your transfer number rings.
Putting iton the phone
A saved template doesnothing until it is mapped to a number. Mapping works per number: a templateanswers the calls that come in on the number it is mapped to, and only those. Atemplate left Unassignedanswers none.
Step 7: Assign your number
Back on Telephony → Inbound Calls, click Assign Inbound Number (or Assign Number on the card if this is your first). The dialog now lists the numbers you bought, with a box to search by number or region. Click a number until its tick shows, then click Assign Number.
Still see No numbers found? The purchase has not gone through yet — use Purchase Numbers or revisit the Phone Numbers guide.
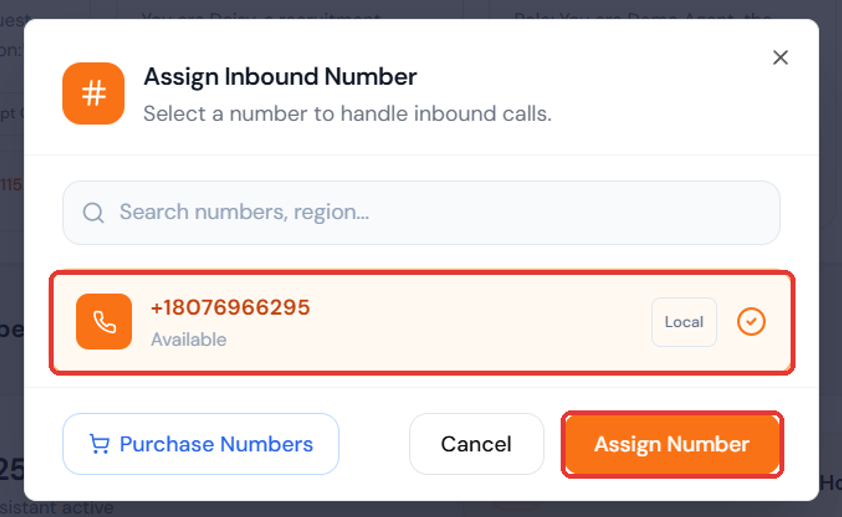
Step 8: Map the template to the number
Every number has its own card under Active Inbound Numbers. Open the Mapped Template dropdown on it and pick the template you saved — here, Hotel Support Desk. From then on, callers who ring that number get that template’s greeting, prompt and behaviour.

Back in the Inbound Templates row, the mappedtemplate’s card now shows the number where it said Unassigned. Templates youhave not mapped — Test Screening and Book demo below — stay Unassigned and takeno calls.
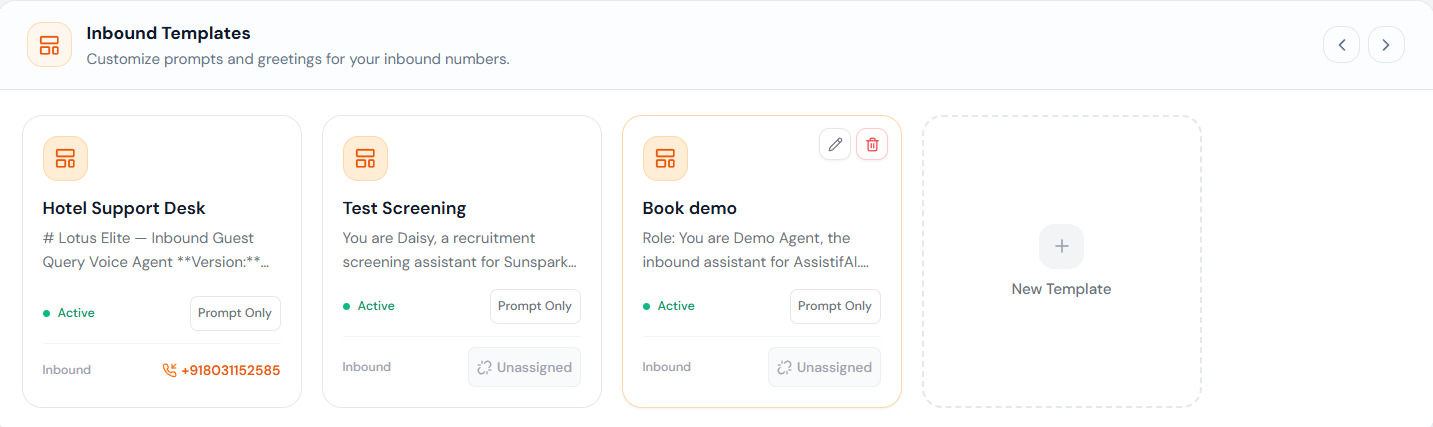
Torun separate lines, such as support on one number and sales on another, mapeach number to its own template. Change a mapping any time with the samedropdown. The bin icon at the right of the card unlinks the number; you willnot need it in normal use.
Step 9: Call the number, then check Call Details
Ring the number you just mapped and have the conversation a customer would. The three tiles on its card — Total Inbound Calls, Completed Calls and Missed / Failed — are your first read on whether it is working.

Each call is then logged under Telephony → Call Details. Make sure the Inbound toggle at the top right is selected. You will see the same three totals, a search box (name, number or agent), and the All Statuses and All Time filters. Call History lists every inbound call with its caller, time, duration and status. Click View Recording at the end of a row to listen to that call, and Export Calls to download the list.
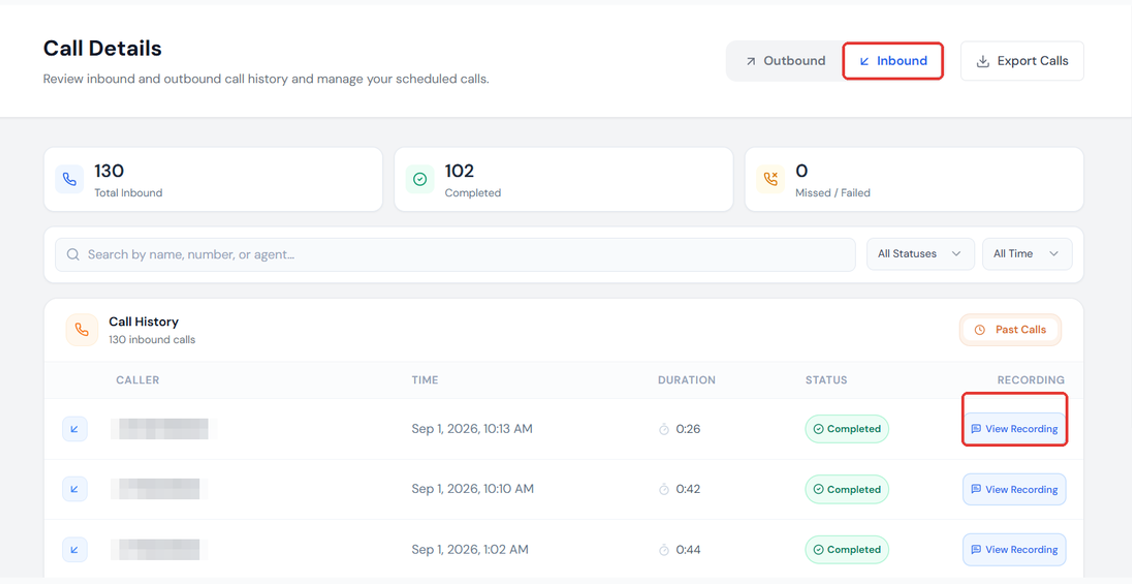
Listen to your first recording before you point real traffic at the number. It is the fastest way to catch a greeting that lands wrong or an objective the AI never gets to.
Where the full history lives
Call Details is the quick view of all calls and recordings. For everything in one place, go to Engagement → Conversations to see the full history of chat, voice and calls. Anything a caller booked or triggered appears under Engagement, in Appointments or Leads Center > All Leads.
If something looks off
Still stuck? Use Get Help in the AssistifAI topbar, or book time with us at assistifai.me/book-a-demo.

