


Numbers
1. Overview
This guide explains how topurchase a dedicated phone number in AssistifAI and use it with yourassistants. A purchased number lets your assistant receive inbound calls andmake outbound calls on a number that belongs to your account.
What you will need
• Access to your AssistifAI account.
• Enough credits in your account balance to cover the monthly price of the number (see Section 2).
• A decision on which country and which type of number(Local or Toll-Free) you want.
• Afterwards, the Inbound Calls User Guide to connectyour number to an assistant (see Section 4).
Pricing and renewal
Because the number renews automatically, you will be charged 200 credits every month for as long as you keep it. If you no longer need a number, release it (see Section 6) so that it does not renew.
Available options
2. Step-by-Step: Purchasing a Number
Step 1: Open the Numbers page
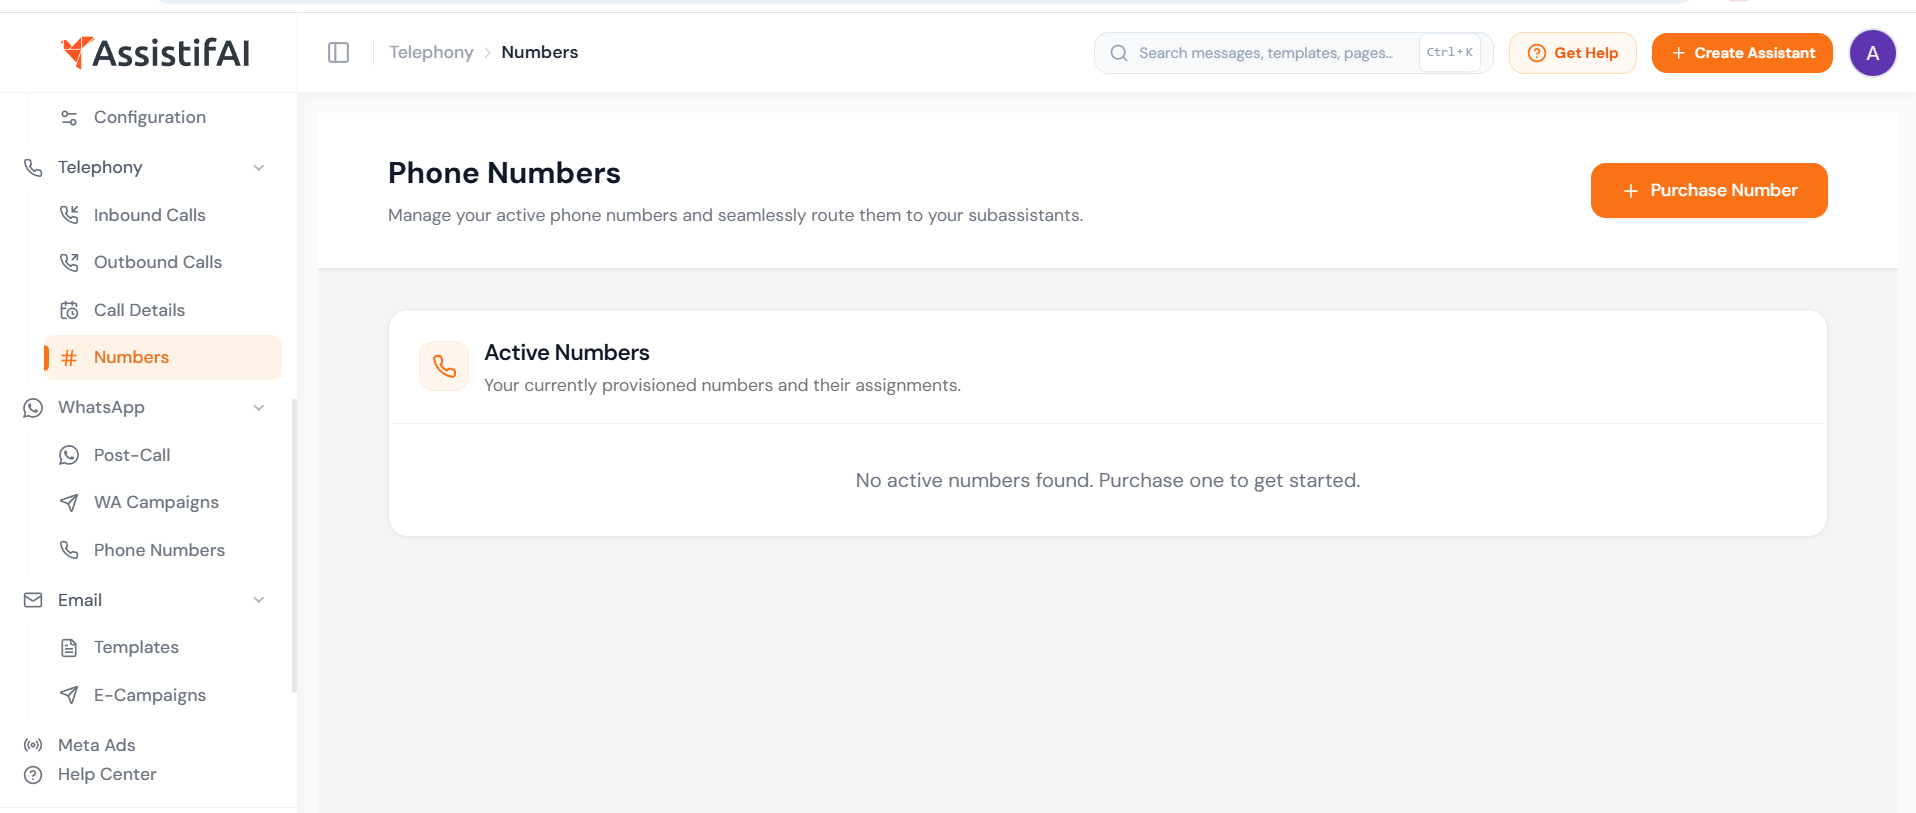
1. In the left-hand sidebar, find the Telephony sectionand click it to expand it, if it is not already open.
2. Click Numbers (the item with the # icon). Thepage title changes to Phone Numbers and the breadcrumb at the top showsTelephony > Numbers.
The page lists your ActiveNumbers. If you have not bought a number yet, you will see the message "Noactive numbers found. Purchase one to get started."

Step 2: Click "Purchase Number"
In the top-right corner of thepage, click the orange + Purchase Number button. The "Purchase aNumber" window opens over the page.
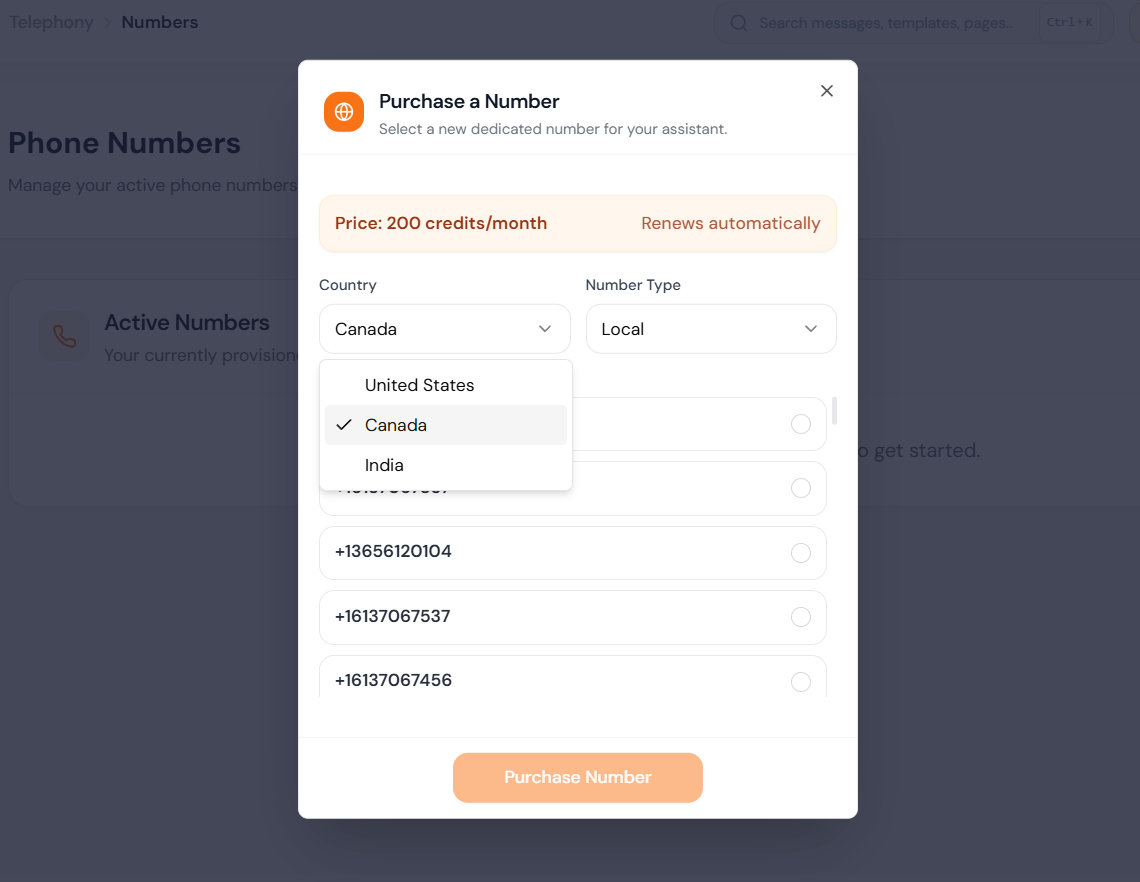
At the top of this window youwill see the price banner: "Price: 200 credits/month" and"Renews automatically". Read this before continuing.
Step 3: Choose a country
Under Country, click thedrop-down menu. The following countries are available:
• United States
• Canada
• India
Click the country in which youwant your number. A tick appears next to the selected country. The list ofavailable numbers below updates to match your choice.
Step 4: Choose the number type
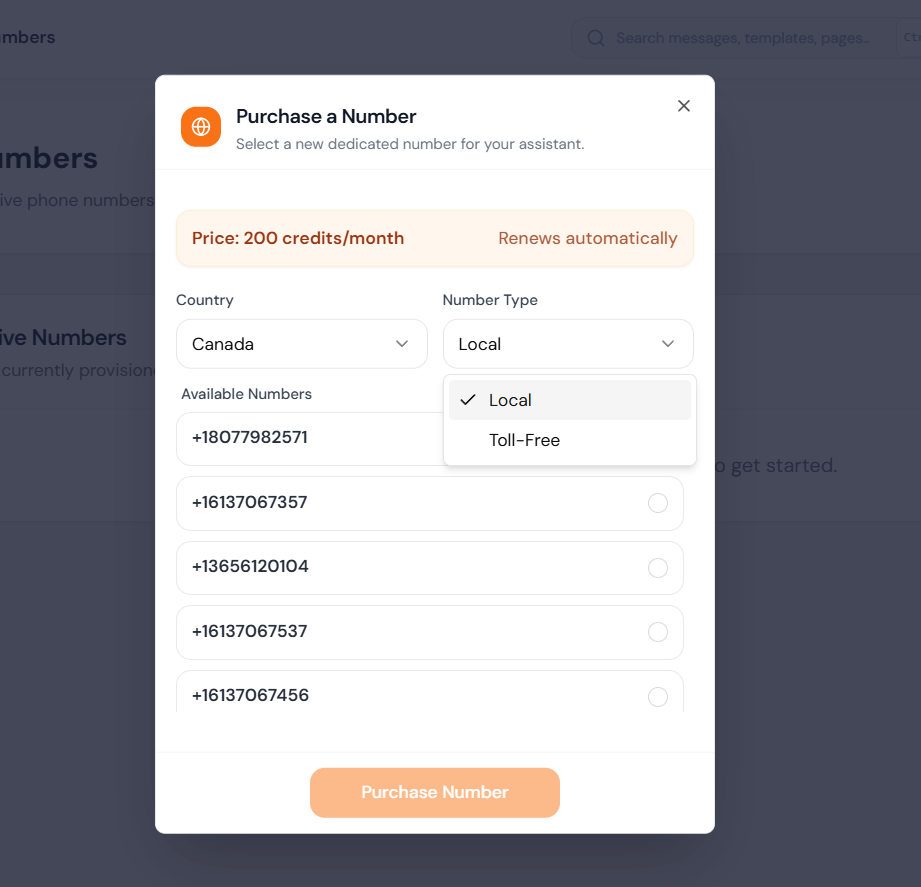
Under Number Type, clickthe drop-down menu and pick one of the two options:
A tick shows the type that is currently selected. The Available Numbers list refreshes after you change the type.
Step 5: Select a number from the list
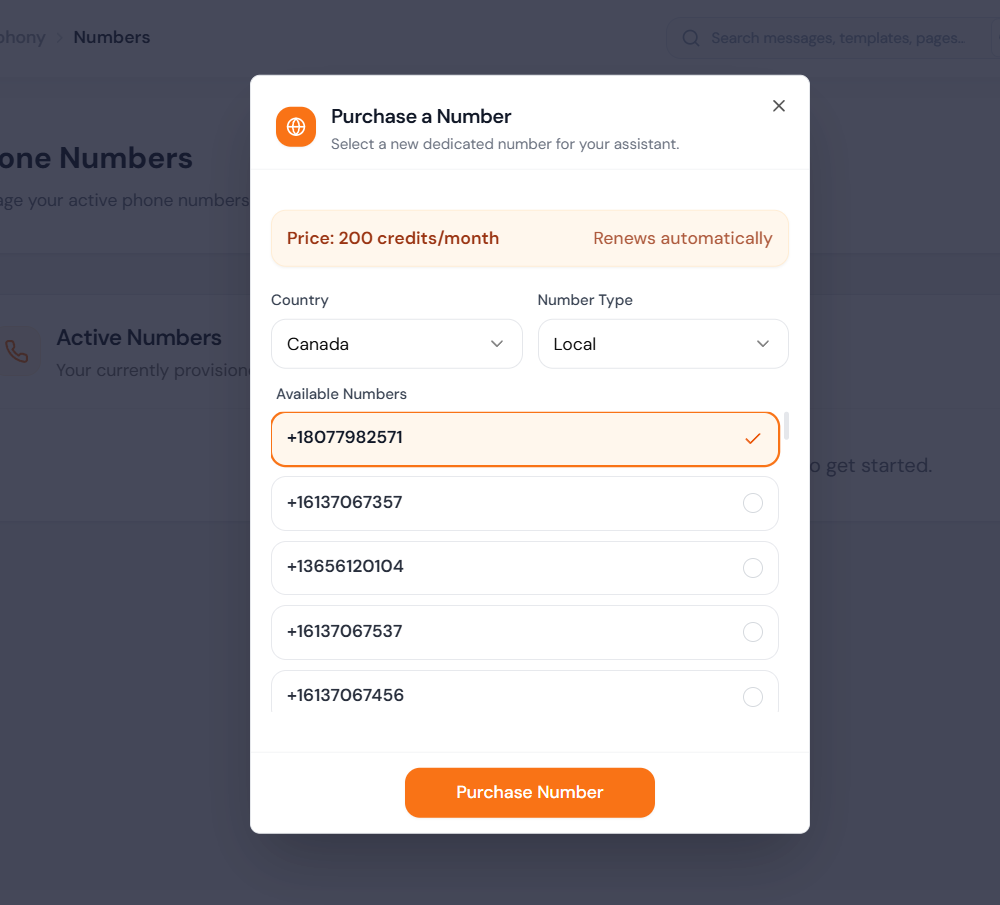
The Available Numbers list shows numbers you can buy for the country and type you selected. Scroll through the list and click the number you want. The selected number is highlighted with an orange border and a tick mark.
• Only one number can be selected at a time.
• To change your mind, simply click a different number.
• If you want a different set of numbers, change theCountry or Number Type first.
Step 6: Confirm the purchase
1. Check the country, type, and number you selected.
2. Confirm that you are comfortable with the price of 200credits per month and automatic renewal.
3. Click the orange Purchase Number button at thebottom of the window.
The window closes and the numberis added to your account.
Step 7: Verify the new number
Back on the Phone Numbers page, your new number now appears in the Active Numbers table. Check that its Status shows Active.
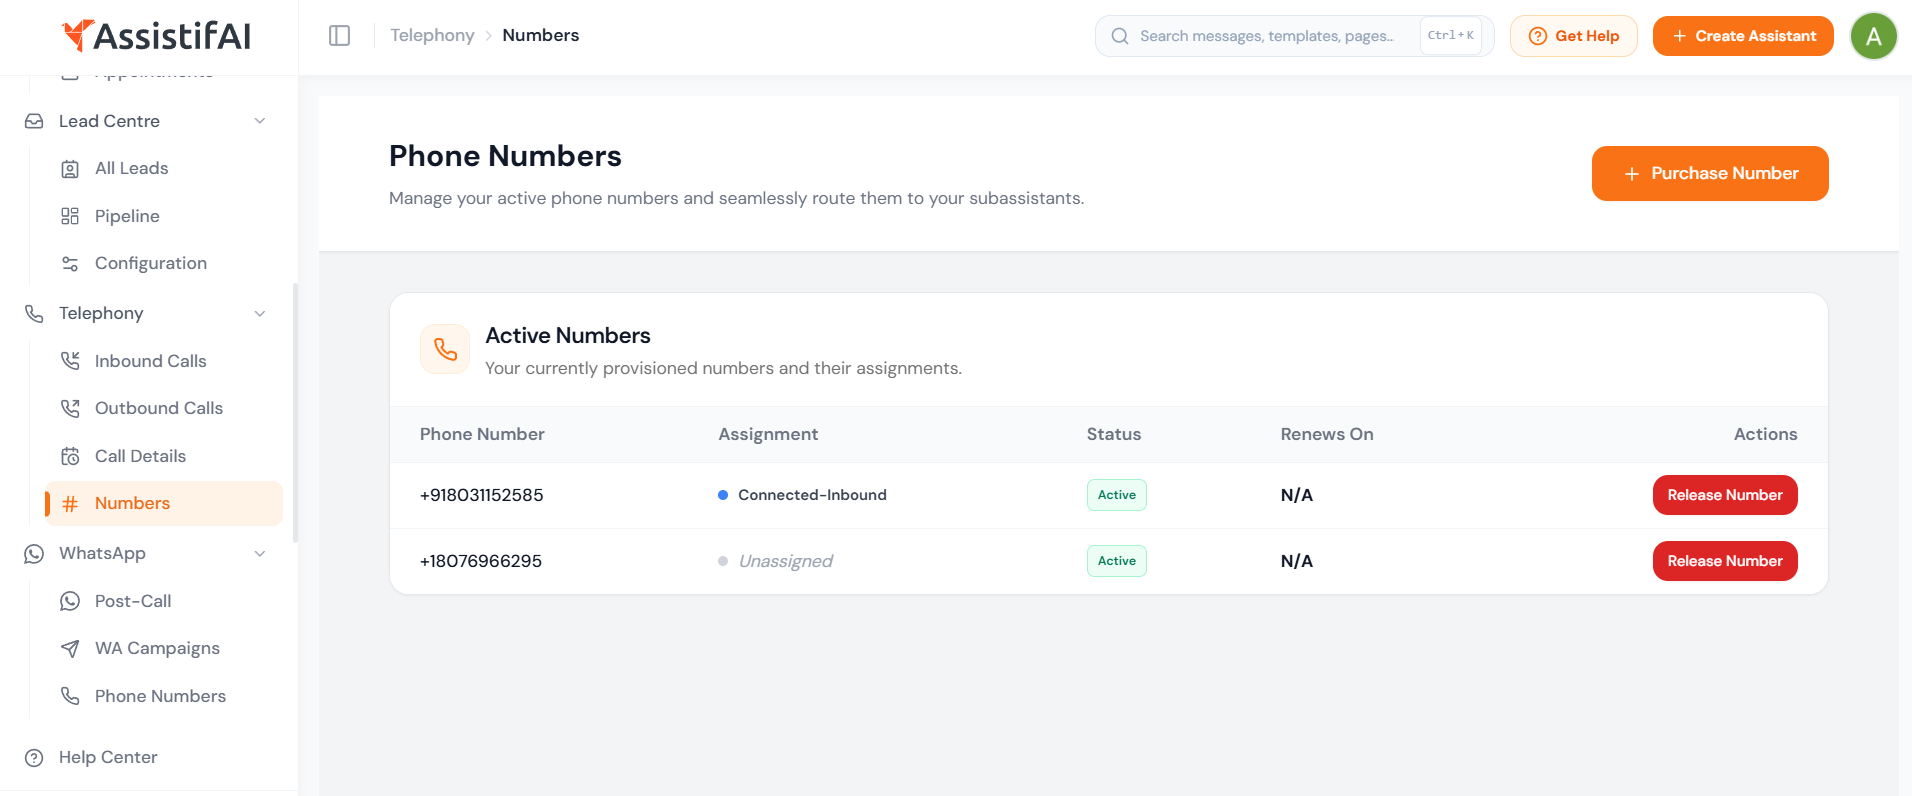
3. Understanding the Active Numbers Table
4. After Purchasing: Using Your Number
A newly purchased number mayshow as "Unassigned" in the Assignment column. An unassigned numberis active and billed, but it is not yet answering calls through any assistant.
Next step: connect your number. Purchasing a number only reserves it for your account. To make your assistant answer calls on it, you need to connect the number from the Inbound Calls page.
In short:
1. Finish purchasing your number using the steps inSection 2.
2. In the sidebar, go to Telephony > Inbound Calls.
3. Follow the Inbound Calls User Guide to select your newnumber and connect it to your assistant.
4. Return to Telephony > Numbers and confirm theAssignment column now shows "Connected-Inbound" for that number.
You can monitor activity on yournumbers from the other pages under Telephony:
• Inbound Calls for calls received on yournumbers.
• Outbound Calls for calls made by yourassistants.
• Call Details for a detailed record of individualcalls.
5. Troubleshooting and FAQs
6. Releasing a Number You No Longer Need
Each row in the Active Numberstable has a red Release Number button in the Actions column. Releasing anumber returns it and stops its monthly renewal.
7. Quick Reference
1. Sidebar > Telephony > Numbers
2. Click + Purchase Number
3. Choose a Country (United States, Canada or India)
4. Choose a Number Type (Local or Toll-Free)
5. Click a number from Available Numbers
6. Click Purchase Number
7. Confirm the number appears in Active Numbers with Status "Active"
8. Connect the number to an assistant: see the Inbound Calls User Guide (Telephony > Inbound Calls)
Need more help? Click the Get Help button in the top bar or visit the page assistifai.me/book-a-demo.

